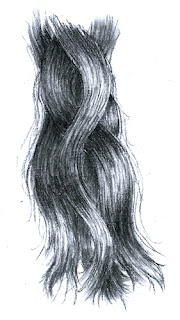
Learn how to draw realistic hair
How to draw realistic looking hair with charcoal in a few easy steps
In this tutorial I will show you how you can use some easy tricks to draw realistic looking hair. Drawing realistic hair is not as hard as you thought if you know what to look for on your subjects hair and how to go about.
Tools you need for a charcoal drawing
 |
| figure 1 |
The first thing you need to know when you want to learn how to draw hair with charcoal is the things you will need. You will need some willow charcoal, compressed charcoal, smudge tools, a rubber eraser with sharp corners and a putty eraser. All these tools are best used together when drawing in charcoal for great results.
 |
| Figure 2 |
How to draw wavy hair with charcoal
Step: Undertone
When you want to draw hair you will start of by using a piece of willow charcoal flat on its side and rub it over the area of the drawing where you want to draw the hair (see figure 2). You can then use a smudge tool to smudge the area and cover it with a base layer. If the subject is blonde, don't make it too dark.
You can look at the effect of light on the hair to see where your highlights will go. These highlights give the effect of healthy, clean and shiny hair. You can leave these parts a bit lighter than the rest of the hair area. See in figure 1 the lighter areas or highlights that give the hair a natural, 3D look.
 |
| Figure 3 |
Step 2: Add some detail
Use a compressed charcoal to add detail. It is best to use a nice and sharp compressed charcoal. Use free flowing lines to add the necessary detail of gestural individual hair. By gestural, I mean you don't have to draw every single hair, just a few to suggest a whole bunch.
Look at figure 3. You will see that the compressed charcoal alone added a lot of detail before you have really added detail. In figure 3 you will also see that the areas I left a bit lighter, now add some volume and this is before using an eraser. I always do this because sometimes I want some areas to be almost white so the hair looks like it is really reflecting a light. This white is, believe it or not, the thing that can easily add that extra definition you need.
 |
| Figure 4 |
Step 3: Create some highlights
Use a rubber eraser to erase some extra highlights and to make white areas that suggest shiny hair. Don't erase the area in such a way that it looks like a block. You can erase the are with some sharp points to make it look natural.
 |
| Wavy hair |
After erasing with a rubber eraser you can use a sharp compressed charcoal to make fine lines in the erased area. This adds to the realistic texture of the drawing of the hair.
Step 4: Finishing your drawing
Make some areas darker where needed so they can fall back more or to imply the color of the hair. Add some single fly-away hairs here and there because face it, no one has perfect hair. You are done!
I hope this was somewhat helpful and that you will be able to draw hair like a master.


No comments:
Post a Comment