Wednesday, 13 November 2013

How to draw an ear

How to draw a human ear

An ear is in fact an easy thing to draw.  The trick is to get the shape and proportion right.  You are halfway there once this is done.  The rest is in the detail.

The most common mistake beginners make is to neglect the dark shadows in the ear and then what you get is a flat ear with no dimension.  An ear still has folds and creases and you need to show this in your drawing.  Remember that who ever looks at your drawing should immediately recognize what you want to portray without you having to tell them.
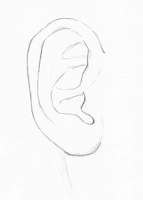
Outline of an ear
In this tutorial I am going to show you how to draw an ear with ease in a few basic steps.  Don't worry if you don't get it right the first time, as with everything in life: practice makes perfect.

Step 1:  Basic shapes

I always start off a drawing by defining the basic shapes found in the object.  An ear can be drawn with a big circle and a small circle.  Connect these circles to form the basic shape of an ear.

Shading of an earStep 2:  Add more detailed lines

Now that you have the basic outline shape of your ear, you can add some more detailed lines.  I draw these lines a bit lighter.  The reason I do that is so that when I start shading, I want the shading to look real and natural.  You can rather make these lines darker by the use of shading later on.
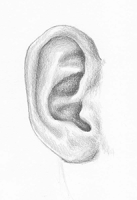
Drawing of an earStep 3:  Add light shading to areas that must appear darker later on.  Gradually make them darker by use of layers

Start adding some light shading to the areas of the ear that are deeper into the drawing or further away.  This will help you to avoid making mistakes.  Don't start too dark, you will regret it later.  Rather start light and work your way towards darker shades by working in 'layers'.

Drawing of an earStep 4:  Add final touches and finish off

Add some more light shading to all the areas that are closer to you or that you want to appear in front of the darker areas.  Remember that an ear is not a flat object so please remember to have some light values, grey values and black values in your drawing.

Hope that you found this step by step guide to drawing an ear useful.


Thursday, 16 May 2013

Learn how to draw realistic hair

Charcoal drawing of hair and eye

How to draw realistic looking hair with charcoal in a few easy steps

In this tutorial I will show you how you can use some easy tricks to draw realistic looking hair.  Drawing realistic hair is not as hard as you thought if you know what to look for on your subjects hair and how to go about.

Tools you need for a charcoal drawing

charcoal drawing of hair
figure 1
The first thing you need to know when you want to learn how to draw hair with charcoal is the things you will need.  You will need some willow charcoal, compressed charcoal, smudge tools, a rubber eraser with sharp corners and a putty eraser.  All these tools are best used together when drawing in charcoal for great results.

willow charcoal
Figure 2

How to draw wavy hair with charcoal

Step: Undertone

When you want to draw hair you will start of by using a piece of willow charcoal flat on its side and rub it over the area of the drawing where you want to draw the hair (see figure 2).  You can then use a smudge tool to smudge the area and cover it with a base layer.  If the subject is blonde, don't make it too dark.  

You can look at the effect of light on the hair to see where your highlights will go.  These highlights give the effect of healthy, clean and shiny hair.  You can leave these parts a bit lighter than the rest of the hair area.  See in figure 1 the lighter areas or highlights that give the hair a natural, 3D look.  

charcoal drawing of hair
Figure 3

Step 2: Add some detail

Use a compressed charcoal to add detail.  It is best to use a nice and sharp compressed charcoal.  Use free flowing lines to add the necessary detail of gestural individual hair.  By gestural, I mean you don't have to draw every single hair, just a few to suggest a whole bunch.

Look at figure 3.  You will see that the compressed charcoal alone added a lot of detail before you have really added detail.  In figure 3 you will also see that the areas I left a bit lighter, now add some volume and this is before using an eraser.  I always do this because sometimes I want some areas to be almost white so the hair looks like it is really reflecting a light.  This white is, believe it or not, the thing that can easily add that extra definition you need.

Figure 4

Step 3: Create some highlights

Use a rubber eraser to erase some extra highlights and to make white areas that suggest shiny hair.  Don't erase the area in such a way that it looks like a block.  You can erase the are with some sharp points to make it look natural.  

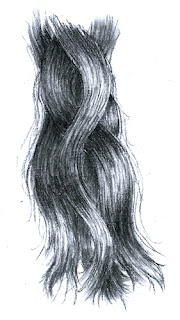
drawing of hair
Wavy hair
After erasing with a rubber eraser you can use a sharp compressed charcoal to make fine lines in the erased area.  This adds to the realistic texture of the drawing of the hair.

Step 4: Finishing your drawing

Make some areas darker where needed so they can fall back more or to imply the color of the hair.  Add some single fly-away hairs here and there because face it, no one has perfect hair.  You are done!

I hope this was somewhat helpful and that you will be able to draw hair like a master. 

Tuesday, 14 May 2013

How to draw a mouth

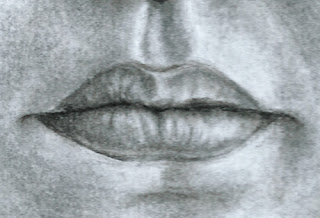
how to draw a mouthLearn how to draw a mouth step-by-step in charcoal, for beginners too!

A person's mouth can be very characteristic.  It is something that is used to speak and show expressions.  A mouth can be a very easy thing to draw or a very hard thing to draw.  In this tutorial I will show you my approach on how to draw a mouth.

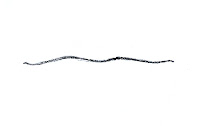
how to draw a mouth: parting lineStep 1:  Draw the lip parting line

You can start of with willow charcoal, which is a bit softer and more forgiving if you make mistakes.  I started with compressed charcoal because I am going to make this line darker later on.  The first thing I draw when I draw a mouth is the line that parts the two lips.  This will just give you a basic indication for the width of the mouth.  You can shape and draw the rest of the lines around it.  This line should be a bit squiggly.  No ones parting line is completely straight.  Note that in the corners of any mouth, the line will either go a little up or a slight curve down.  In this case the corners of the mouth I am drawing is curving slightly up and then down.

Step 2:  Draw the shape of the mouth

The next thing I do when drawing a mouth is to draw the shape of the upper and the lower lip.  The lower lip is most of the times a bit thicker than the upper lip.  The upper lip forms a wide 'M'.  The little 'v' is in the middle of the mouth and the legs of the 'M' come down close to the corners faster than the bottom lip.  In other words the lower lip should be a bit wider than the upper lip.  Don't make these lines too dark because you don't want a too dark lip-line later on.

how to draw a mouth: basic shadingStep 3:  Add the basic shading

Use willow charcoal and give both the upper and lower lip a basic tone.  You can then use a smudge tool to soften the appearance and for a more natural texture.  Depending on your light source, the upper lip might be a bit darker if the light is from above the subject.  The area close to the mouth opening can be a bit darker because less light reaches this area.  It is important to remember that the mouth is not flat and still takes up volume.  So try to point out the areas where the light reaches the most and where it reaches less.  The areas where it reaches less will fall back in the drawing and the areas where it reaches most should pop out of the drawing.

Step 4:  Drawing in some highlights with an eraser

Use a rubber eraser to get sharp highlights and a putty eraser to make certain areas lighter with a more gentle touch.  This should already add some detail to the drawing.  Do this step before you add darker tones and detail.

Step 5:  Add more detail with a sharp willow

Use some sharp willow charcoal to add more detail on the places you want to add detail lines with charcoal later.  This is also the step where you add enough willow to create volume on the lips.

Step 6:  Smudge some of the willow and add detail with a compressed charcoal

This is the final step an d this is when you add detail with a sharp compressed charcoal.  Use a smudge tool to smudge some of the willow charcoal from the previous step.  Make the line between the lips darker to create the illusion of the lips being able to sepperate.  Then use a very sharp compressed charcoal to add light lines.  This will give the mouth some texture.  Use an eraser or putty eraser where necessary to add highlights.  And you are done!

I hope you enjoyed this tutorial and that you will impliment some of these tips and techniques in your drawings.

Monday, 13 May 2013

How to draw: a nose

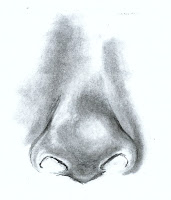
Drawing of a noseLearn how to draw a nose 

In this tutorial, is my approach to drawing noses and I find it to work great for me.  I hope you can use some of these tips when you draw noses in your drawings.

In this tutorial I will teach you how to draw a nose.   I always use to dread drawing the nose and postpone it while I was drawing.  I use to struggle with getting it to look right and I use to struggle to get it to look like it is 3D.  I have practiced it a lot since and have studied noses a lot because I wanted to like drawing noses and not hate it. 

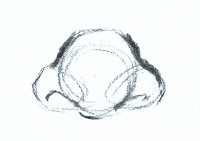
basic shapes of a noseStep 1: Basic shapes of the nose

I usually start with the basics of the nose by drawing the geometric shapes it consists out of.  The most basic shape of the nose is a circle with two little circles on both sides.  I prefer drawing those small circles on the side of the nose a little bit triangular.  This will help me later on when I draw detail.

shape of a noseStep 2:  Draw the shape of the nose and the nostrils. 

I draw a bit more detail over my basic shapes by creating the outline.  I draw the nostrils in both those small triangular circles.  Take note that nostrils are not completely half circles but have a little bit of a triangular shape.
Charcoal drawing of a nose with basic shading 

Step 3:  Start adding a base color or value 

I start adding some base values.  I add some basic shading to the areas I want to fall back more.  I leave other areas white that I want to come forward out of the drawing.  This will create some illusion of depth.

Charcoal drawing of a noseStep 4:  Continue adding shading 

I continue to add some shading in layers until I am satisfied.  I use and eraser or putty eraser to erase areas I accidentally made a bit to dark and to add highlights.  I have also made some mistakes here and there and I also fix them with the putty eraser.  I use some compressed charcoal to add those darker lines around the nose and then ad some more shading with the willow.  Pay attention to your light source to see where the light hits the nose and where not.

charcoal drawing of a noseStep 5:  Shading the nostrils and adding detail. 

Now that I have my shading almost done, I can start with some extra detail.  I use my compressed charcoal and a little bit willow charcoal for the nostrils.  The nostrils are very easy to add detail to.  It is a hole and falls back the most so it should be darker than most of the shades currently in the drawing. 


So this is how I draw my noses.  I hope you like it and that you learnt something new.

Friday, 10 May 2013

How to draw a portrait or face

Pastel portrait drawingHow to draw a portrait by studying the human face and proportions. 

I will give you some tips regarding how to draw a portrait by using a step-by-step measuring guide.  There are certain elements of the human face that can be used as guidelines when drawing portraits.

Different shapes for faces
Different face shapes


1.  Shape of the face

You should study and learn about the shape of the human face.  There are different shapes of faces for example; square, heart, oval, round, oblong and diamond.  The first thing you need to determine when you want to draw a portrait is which shape face your subject has and then draw that first.  The rest of the elements all follow. 

2.  The eyes

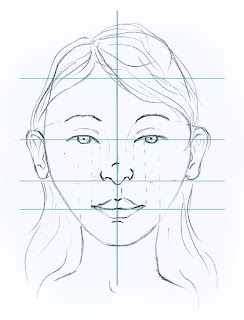
The face should be divided into four; one line vertically and the other horizontally.  The eyes go into the middle of the face on the horizontal line (I usually measure it so the line goes through the pupils).  One eye can fit into the width of the human face five times.  When you have drawn the shape of the face, there should be enough space for one eye to fit in between the eyes.  There should also be enough space for one eye to fit into each of the temple areas next to the eyes.  

The iris is in the middle of the eye and the pupil is in the middle of the iris.  The eyebrows will need to be drawn according to the expression of the subject but in most cases another eye should almost be able to fit in between the eye and eyebrow.  Learn how to draw eyes
Drawing of face with proportion measures
Figure 1

3.  The nose

The face is further divided into two between the half line where the eyes go and the bottom of the chin.  On this line is where the nose will go.  I measure it on the tip of the nose.  The width of the nose can be measured by drawing two imaginary lines from the inner part of the eyes down to the nose.  Learn how to draw a nose

4.  The mouth

The face is then further divided into two between the nose line and the chin and this line forms the line where the mouth goes.  Depending on the shape of your subjects face, whether it be long or round, the mouth may be a little above, - below or on the line.  The sides of the mouth can be measured by drawing an imaginary line from the inner part of both the irises down to the mouth. (see figure 1 for further details)  Learn how to draw a mouth

5.  The ears

The ears can be measured in line with the eyebrow's natural curve or with the top lid of the eye down to the tip of the nose.

6.  Neck

The width of the neck is measured in line with the outside lines of the irises.

7.  The hairline

The area above the eyes should be divided in two and a little above the top half is where most hairlines normally start.  But bare in mind that some people have a low hairline while others have a high hairline.  Learn how to draw hair

I hope you will use this guide when you draw portraits in the future and that you will find it useful. i found it extremely useful to know this because I have tested it and these calculations apply to everyone.

Thursday, 9 May 2013

How to draw with different mediums

Learn about different mediums in drawing

In this post I am going to talk a bit more about different drawing mediums.  

By learning about different drawing mediums, you also develop your style.  It is good for an artist to have at least a basic knowledge of all the available mediums out there.  As you experiment with different mediums, you will find out what you like and you might decide you only like one medium and don't want to use any of the rest, that's fine.  That's how you develop your style.  You need to know what you like and what you don't.  

Most beginners never learnt about any other medium but pencil and are stuck in the mindset that pencil is their favorite medium.  I encourage you to have a look at all the mediums I am going to discuss and just try it, you will be surprised that you might like something that you never thought you will.

I am going to discuss five drawing mediums:
  1. Pencil
  2. Graphite
  3. Charcoal
  4. Pen and Ink
  5. Brushes and Ink

Pencil tonal spectrum1.  Pencil

Pencil is the most universal medium and is also a very easy medium to use.  It varies from hard to soft (2H, H, HB, 2B, 4B, 6B etc.), black and varied thickness.  The harder the lead (H, 2H etc.), the lighter the tone delivered.  The softer the lead (2B, 4B etc.), the darker the tone it produces.  Pencil is a medium that is very precise and can be used loosely.  When you draw with pencil you want to use a combination of hard and soft pencils and a varying degree of blackness.  For example, the most commonly used combination of pencils in a drawing is HB (the light tone), 2B (the mid tone and also the most versatile pencil) and a 4B or 6B (the dark or black tone).

Graphite marks2.  Graphite

Graphite is a bit more versatile than pencil and comes in a wooden casing or as a solid stick with a plastic covering around it.  The solid stick of graphite lasts longer because it is more solid and thicker.  You can use the solid stick to draw thick lines or thin lines and also comes in very handy when shading a drawing.  The wooden casing might feel a bit nicer to draw with.  Graphite also varies from hard to very soft and different tones of blackness.

3.  Charcoal

Charcoal marks
Charcoal is my personal favorite medium because of the contrast it creates and also because I find it to be very versatile.  There are different types of charcoal namely compressed charcoal, compressed charcoal sticks and willow charcoal.  Compressed charcoal can be found with a wooden casing, with a plastic covering or as sticks.  It is also mostly used to add finer details into drawings because it can give more refined an precise lines.  Compressed charcoal is used with willow charcoal, which are light sticks that come in varied thickness.  Willow charcoal is excellent for laying down a "base coat" on the drawing surface and to create different tones in the drawing but should always be used with compressed charcoal.  Charcoal is a messier medium and can be used with smudge tools or your fingers to smudge the willow charcoal for shading. A charcoal drawing must also be fixed with a fixative (you can use a colorless hairspray as well) or it can be placed interleaved pieces of paper while transporting your drawing. 

4.  Pen and Ink

You can use push-pens, dip-nibs or fine liners to draw with.  This is a good medium to use with ink to add finer detail to a drawing but can also be used completely on its own.  A dip-nib does not have an ink cartridge and should be used with drawing in, most commonly 'Indian ink' and can be water soluble or permanent.

5. Brushes and Ink

Brushes can be used for washes of tone so I often use it with water soluble or permanent 'Indian ink'.  When you use ink as a wash, remember to dilute the ink with water to get lighter tones.  Start your drawing with very light tones (very diluted ink) and work your way up like with layers by slowly diluting it less until you achieve the tones you want.  

I normally carry a few different brushes with me namely numbers 0/2, 2, 1, 2 and a 6; all of them round and then one flat 6.  I find these brushes make a good mark and are all useful in any ink drawing.

I hope that you will be open to experimenting with all of these drawing mediums before you decide to only stick to one specific medium.  As you play around with different drawing mediums, you will enrich your knowledge of drawing styles and techniques.  I hope that as you learn about these mediums while drawing with them, that you will also learn to control them.

Tuesday, 7 May 2013

How to draw eyes

How to draw realistic eyes

In this post I will discuss a step by step tutorial on how I draw eyes.  

I believe that in order to draw realistic eyes, they need to look alive.  Eyes are wet and have a shiny texture.  Eyes are also white and people sometimes tend to forget that.  In essence, in order to get the eyes to look real and alive, you need them to appear white and also have a wet texture.

Drawing of an eye on tea wash paper
Figure 1
When I first started out drawing portrait, I had a basic understanding of eyes.  But like most people, my brain couldn't completely work out how I was going to do it.  After a lot of observation and trial and error, I found an easy way to add detail that looks incredible but aren't complicated at all.

Shape of an eye

All the elements of drawing still apply when you want to draw an eye.  But what I have noticed is that an eye needs some extra attention when it comes to shape.  Everyone is unique and so is the shape of his or her eyes.  Some people have big eyes while others have small eyes.  There are people who have "cat eyes" and some that have round eyes.  One must always remember that no one's eyes are the same.  When you are drawing the shape of the eyes, you must also consider the facial expression.  If the facial expression happy or laughing, less of the iris will show and there will be laugh lines near the temple.  In figure 1, the expression in the eye is awake and more alert.

In this tutorial on how to draw eyes, I am going to focus on one eye and it's details.  I normally just repeat everything on the other eye.  I am drawing with willow charcoal, compressed charcoal, a putty eraser, a rubber eraser and smudge tools.
step 1 of drawing an eye
Figure 2

Step 1

An eyeball is round and the soft skin and hair, all form around it.  The first thing I start with when I draw an eye is the eyeball and then I start with the shape of the eye (see figure 2). I start of with willow charcoal.  Willow charcoal is softer and less permanent than compressed charcoal.  It is also a nice medium for shading.
step 2 of drawing an eye
Figure 3

Step 2

The next thing I do is draw the iris and pupil.  I then draw the eyelid above and under the eye.  The next thing I do is ad the eyebrow.  I fill in smaller details like spaces I want to keep white.  The reason for this is because these spaces that are left completely white, will pop out and make the eye look 3D and also gives it a glossy texture.  If you forget to leave those areas white, you can always use an eraser to reverse it, but bear in mind it might not be as white so try to always mark the places you want to leave white (see figure 3).
step 3 of drawing an eye
Figure 4

Step 3

In my next step, I do a basic under tone for my drawing with willow charcoal.  I smudge the charcoal to get a nice and even tone and then add more charcoal where needed until I am satisfied.  This helps so when I add my detail, I can just add over it in another layer.  But some spots will go darker and some might go lighter, depending on the detail I add later on.  This is my first step to creating volume and shading. 
step 4 of drawing an eye
Figure 5

Step 4

I then add some detail on the skin and eyebrows with my compressed charcoal (I always leave the delicate eyeball area for last).  Compressed charcoal is a hard type of charcoal that gives you more permanent lines.  It is also darker than willow charcoal and can be treated like a pencil.  I sometimes charcoal to add darker tones over the willow charcoal.  I find that it works nicely for me. 

Step 5

step 5 of drawing an eye
Figure 6
After I have added some detail to the areas surrounding the eyeball, I can start with the fun part.  Doing the eye ball and the iris.  I use my smudge tool that is a bit dirty by the end of the sketch to add the volume to the white area.  Remember to leave those marked spots white.

I use my compressed charcoal to add the detail in the iris.  Make sure your charcoal is nice and sharp, this way you can get darker and more defined lines for detail. 


Drawing of an eye
Figure 7

Step 6

To finish off the drawing, I add the lashes.  Even though I have drawn a man's eye, he still has lashes.  Pay attention to the shadow they cast over the eyeball.  Use a sharp compressed charcoal to add the lashes and a dirty smudge tool to add the shadow.  

And there you have the final sketch.  I hope you enjoyed the tutorial and that you use the tips I gave you.


View page